📑 Table of Contents (7 sections) — Tap to expand
⚡ Quick Takeaway (Position-0 Summary)
To clean and unstick a rusted padlock, spray penetrating oil (WD-40 or Zorrik 88) into the keyhole and shackle joints, let it soak for 10–15 minutes, gently work the key back and forth without forcing it, then once loosened, follow up with dry graphite powder for long-term smooth operation, since wet oil alone attracts airborne dust over time.
Why Outdoor Padlocks Seize Up in Indian Homes
Few things are more frustrating than standing before your terrace gate, storeroom door, garden shed, or overhead water tank latch with a padlock that suddenly refuses to accept its key, won't turn, or remains stubbornly clamped shut even when the key rotates. Padlocks installed outdoors across Indian properties face extreme humidity swings, relentless monsoon downpours, and constant road dust — all working against an internal mechanism designed with razor-thin mechanical tolerances.
Corrosion attacks padlocks at two distinct friction points: inside the internal pin-tumbler or lever mechanism where fine brass pins or steel levers must align cleanly, and along the hardened steel shackle's locking notched recesses and pivot collar. Even a microscopic layer of oxidation locks these sliding surfaces together. While unbranded brass or iron locks corrode rapidly, even trusted brands like Godrej Nav-Tal, Link, and Harrison eventually seize if neglected after heavy rains.
The golden rule of restoring a stuck padlock is patience over brute force. Heavy torsion will snap your brass key inside the barrel, turning a five-minute chemical flush into an emergency requiring angle grinders or bolt cutters.
What You Will Need
Assemble these simple cleaning supplies and specialty lubricants before starting:
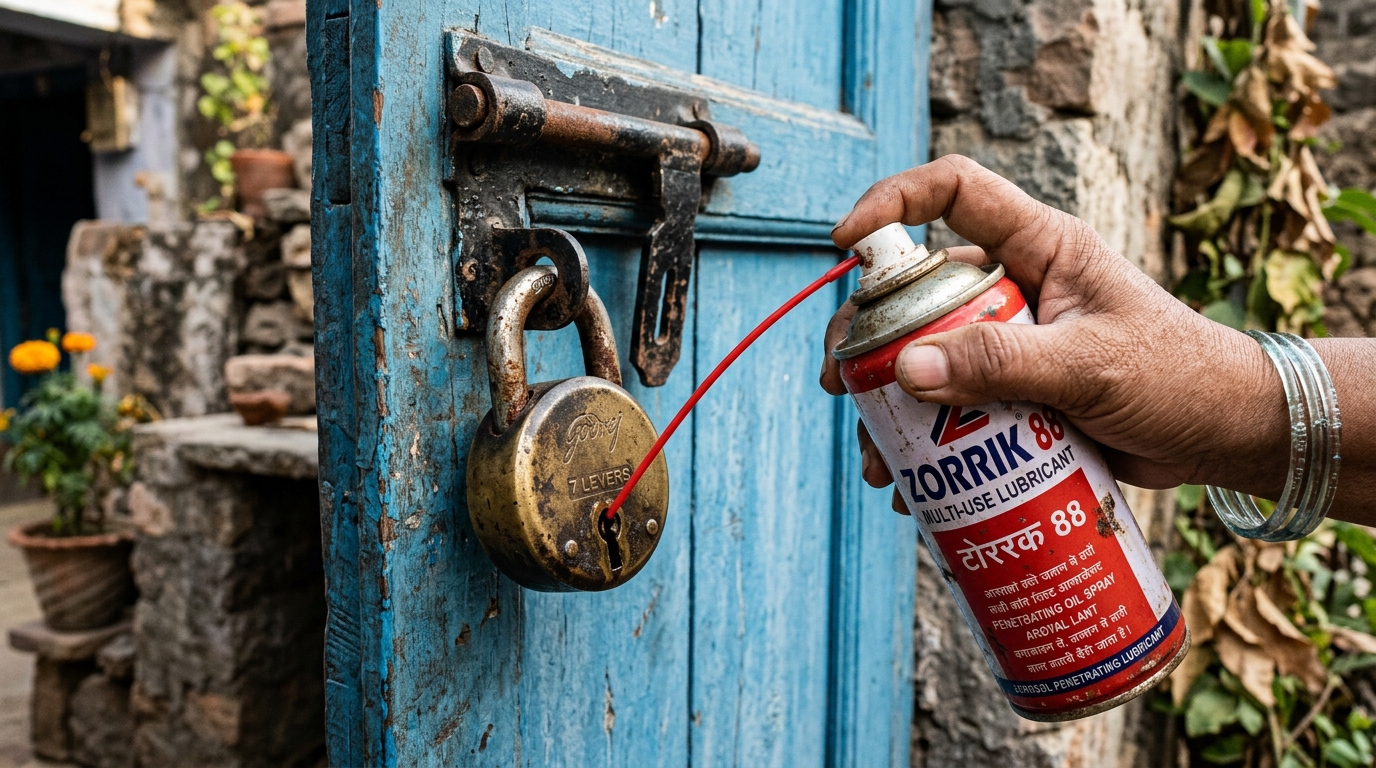
- Aerosol Penetrating Oil: WD-40, Zorrik 88, or Rust-Oleum Penetrating Spray with a precision red straw nozzle.
- Dry Micronized Graphite Powder: Locksmith-grade dry powder lubricant (available at local hardware stores) to protect against future dust attraction.
- Stiff-Bristle Detail Brush: An old nylon toothbrush or brass wire detail brush for clearing surface scale.
- Needle-Nose Pliers & Flashlight: For inspecting internal chambers and coaxing frozen shackles.
- Microfiber Rag & Solvent: Acetone, isopropyl alcohol, or mineral turpentine to wipe away overspray.
⚠️ Critical Safety Warnings
Read this before you start:
- Never apply excessive rotational force on the key: Brass keys have low shear strength and will snap off flush with the keyway, permanently jamming the cylinder. If you meet hard resistance, stop turning immediately.
- Protect painted gates and masonry from chemical overspray: Aerosol penetrating solvents dissolve fresh paint coatings and stain porous stone. Hold a cardboard backing shield behind the lock while spraying.
- Evaluate critical safety enclosures: If the padlock secures emergency utility equipment (such as a commercial LPG cylinder bank, fire hose cabinet, or main electrical switchboard), do not spend hours troubleshooting — cut the lock with bolt cutters and replace it with a weather-sealed padlock immediately.
- Operate in well-ventilated areas: Aerosol solvent propellants can cause dizziness when inhaled in enclosed stairwells or tight electrical cupboards.
Step-by-Step Practical Execution Guide
Follow these 10 structured steps to chemically loosen rust and restore silky smooth operation to your padlock:
-
Step 1: Diagnose the Failure Point
Insert the key gently without twisting hard. Observe whether the key fails to slide all the way into the cylinder, gets stuck when attempting rotation (internal pin/lever lockup), or rotates 90 degrees while the U-shackle stays clamped (shackle latch ball seizure). Diagnosing this dictates where to focus your spray. -
Step 2: Clean External Rust, Grime, and Cobwebs
Take an old stiff toothbrush and scrub around the keyhole entry slit, the drainage weep hole at the base, and the two circular shackle entry collars. Knocking away dry crust prevents debris from being pushed deeper into the mechanism. -
Step 3: Inject Penetrating Oil Into the Keyhole
Fit the thin red straw attachment onto your penetrating oil can. Slide the straw tip deep into the keyway and deliver two brisk 2-second bursts. The liquid should flush out discolored orange and brown rust slurry. -
Step 4: Saturate Both Shackle Pockets and Weep Holes
Aim the straw directly at the seam where each leg of the shackle enters the lock body. Spray generously so the fluid flows down toward the internal locking spring detents. If the padlock has a bottom weep hole, inject oil there as well. -
Step 5: Allow 10 to 15 Minutes for Chemical Creep
Do not immediately wrench the lock. Penetrating oils rely on low-viscosity capillary action to creep into sub-millimeter clearances, dissolving ferrous oxide bonds. Let the chemical soak undisturbed for at least 15 minutes. -
Step 6: Gently Exercise the Key in Micro-Increments
Slide the key fully in and out three times to exercise the spring-loaded pins. Next, apply gentle, rhythmic back-and-forth wiggling pressure (5 to 10 degrees in either direction) rather than forcing a full turn. The subtle oscillation breaks up microscopic rust crystals. -
Step 7: Coax the Shackle With Gentle Lateral Wiggling
Once the cylinder turns, if the spring-loaded shackle doesn't pop open on its own, grip the U-bar with gloved fingers or padded pliers. Wiggle it laterally while tugging outward. Lightly tap the lock body with a small wooden mallet or screwdriver handle to shock the internal detent balls loose. -
Step 8: Repeat the Soak-and-Agitate Cycle for Heavy Corrosion
If the lock remains seized, apply a second round of oil and allow a 30-minute soak. In stubborn locks, warming the lock body gently with a household hair dryer helps expand the metal casing and accelerate solvent penetration. -
Step 9: Flush and Wipe Away Residual Wet Solvents
Once the padlock opens and snaps shut freely, wipe the exterior body, keyway, and shackle spotless with a microfiber cloth. Leaving excess liquid oil on the surface turns into a magnet for airborne road dust and grit. -
Step 10: Apply Dry Graphite Powder for Lasting Protection
Puff a fine cloud of locksmith-grade dry micronized graphite powder into the open keyway and onto the shackle latch notches. Insert the key and cycle the lock 5 times. Dry graphite provides smooth self-lubrication without attracting dust or gumming up over time.
💡 Pro-Tips From the Field
- Never use cooking oil or automotive grease inside locks: Mustard, coconut, or vegetable oils polymerize and turn into sticky varnish over time, completely cementing the internal brass pins into permanent failure.
- Pre-monsoon graphite maintenance: Before the rainy season arrives in June, puff graphite powder into every exterior gate and terrace padlock. Graphite forms a hydrophobic barrier that shields internal springs from moisture.
- Use a protective rubber shroud for exposed gate locks: Cut an old bicycle inner tube or slip a purpose-built silicone padlock weather jacket over the body to divert direct monsoon downpours from entering the keyway.
- Know when to retire an aging padlock: Cheap unbranded locks corrode down to paper-thin spring coils. If a lock seizes every two months despite proper lubrication, replace it with a marine-grade stainless steel or brass padlock.
Troubleshooting Common Mistakes
- "I sprayed penetrating oil but the key still won't turn at all"? The internal springs or pins may be bonded by heavy galvanic corrosion. Reapply oil, wait a full 30 to 45 minutes, and tap the lock body lightly with a block of wood to send acoustic shockwaves through the cylinder.
- "The key turned halfway and now it is stuck tight in both directions"? The plug is caught between pin shear lines. Do not twist aggressively. Push the key gently inward while wiggling back and forth in millimeter strokes to allow the pin stacks to drop back into alignment.
- "The shackle popped open once, but now refuses to latch shut"? The internal spring-loaded locking dog or steel ball bearing is frozen in its retracted pocket by sludge. Spray penetrating solvent straight into the open shackle socket, let it drain, and depress the latch repeatedly with a small hex key until the spring snaps back vigorously.
Conclusion & Related Reads
A seized padlock doesn't automatically mean breaking out bolt cutters or ruining your gate latch. By pairing a fast-acting penetrating solvent like WD-40 with patient incremental manipulation — and locking in smooth long-term operation with dry graphite powder — you can restore years of dependable security to your outdoor hardware.
Explore more hardware maintenance, rust prevention, and metal care guides on CarpenterWala:

Rajesh Sharma
Verified SpecialistMaster Carpenter & Woodwork Consultant
Over 15 years of custom woodworking, furniture restoration, and modular interior fittings experience in Bangalore.
⚖️ DIY vs. Hiring a Professional: When to Call an Expert
✓ Safe to DIY
- Minor screw tightening or loose hinge lubrication
- Basic component replacement with matching dimensions
- Routine surface touch-ups and non-structural adjustments
⚠️ Hire a Verified Pro
- Structural woodwork warping, masonry drilling, or rotted frames
- High electrical voltages, MCB trips, or water line pipe bursts
- Multi-room installations requiring specialized power equipment
💬 Comments (0)