📑 Table of Contents (7 sections) — Tap to expand
⚡ Quick Takeaway (Position-0 Summary)
To apply rust converter primer to outdoor iron railings, scrape away flaking rust and debris with a wire brush, apply the converter solution in a thin, uniform coat directly over remaining tight rust using a dedicated paintbrush, allow it to react chemically until it converts into a dark blue-black magnetite shield, and finish with a durable outdoor enamel topcoat.
The Chemistry of Rust Conversion on Ornate Iron Railings
Iron railings on balconies, staircases, and boundary walls are architectural highlights of Indian homes, but they bear the brunt of severe environmental punishment. Months of scorching solar UV radiation give way to relentless monsoon rains and coastal or urban atmospheric humidity. Soon, telltale patches of reddish-orange rust break through the paint, spreading like cancer through intricate metalwork.
On simple flat steel beams, grinding down to shiny bare metal is straightforward. But outdoor railings typically feature intricate floral scrollwork, twisted balusters, cast rosettes, and tight weld pockets where angle grinder discs simply cannot reach. Spending endless days hand-scraping every square centimeter of ornamental filigree is exhausting and often ineffective.
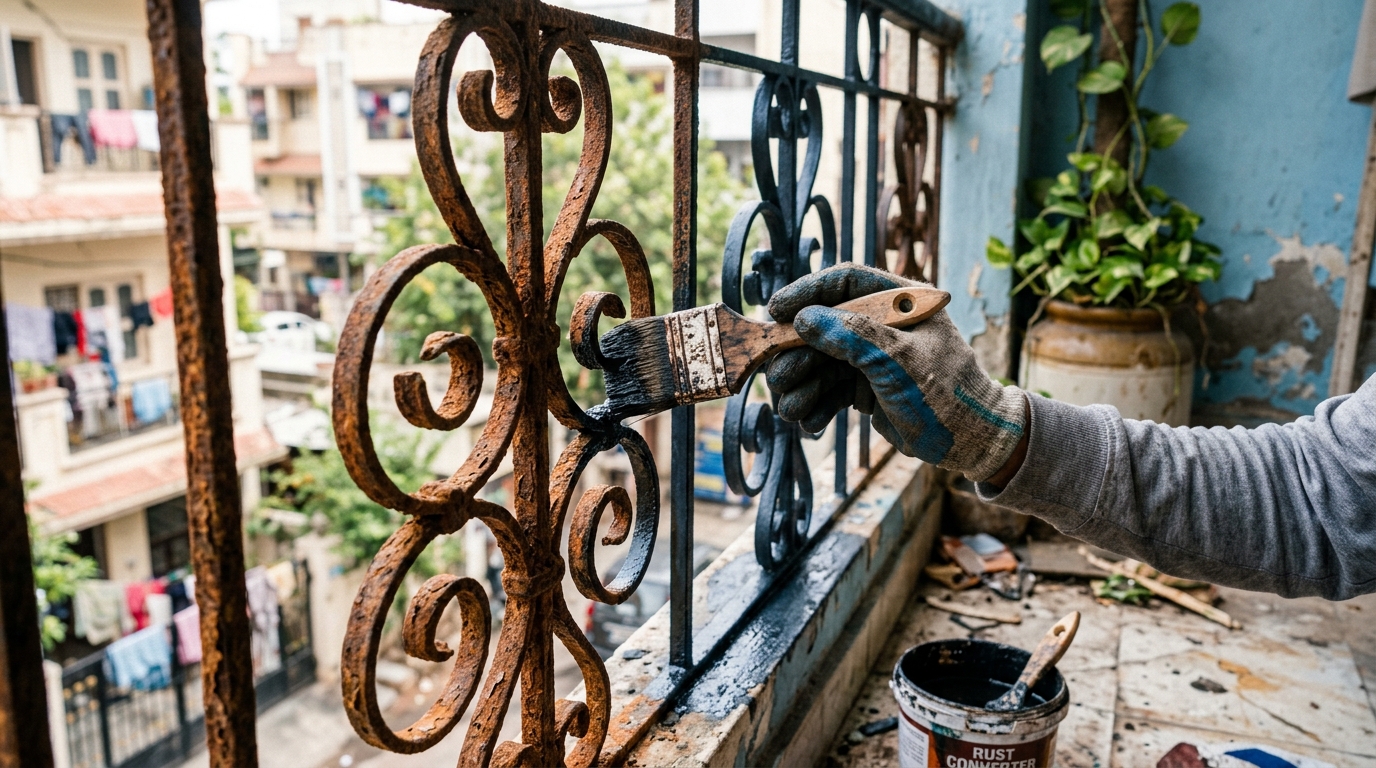
This is where chemical rust converter primer transforms the restoration process. Rather than requiring mechanical removal of every microscopic rust crystal, rust converters use active phosphoric or tannic acid polymers that react with iron oxide (rust). The chemical process converts unstable porous ferric oxide ($Fe_2O_3$) into an inert, insoluble, dark blue-black iron tannate or ferric phosphate barrier ($FePO_4$). This molecular transformation permanently arrests ongoing oxidation and creates a rock-solid, paintable foundation for your final enamel coat.
What You Will Need
Assemble these tools and materials before beginning surface preparation:
- Commercial Rust Converter Primer: Tannic-acid or phosphoric-based converter (e.g., Rust-Oleum Rust Reformer, Pidilite Roff Rust Clear, or Asian Paints Rust Converter).
- Wire Scratch Brushes: Handheld stiff carbon steel brush and narrow brass detail brush for scrollwork.
- Medium-Grit Emery Sandpaper: 80-grit and 120-grit emery sheets for de-scaling loose paint.
- Dedicated Natural Bristle Brush: 1.5-inch or 2-inch brush exclusively for chemical converter application.
- Surface Cleaner & Degreaser: Mineral turpentine, acetone, or mild detergent water with lint-free rags.
- Protective Gear: Chemical-resistant nitrile gloves, safety eye goggles, and an organic vapor dust mask.
- Exterior Enamel Topcoat: Premium exterior polyurethane or alkyd enamel paint with anti-corrosive primer.
⚠️ Critical Safety Warnings
Read this before you start:
- Always wear chemical splash goggles and nitrile gloves: Rust converters contain acidic compounds (such as phosphoric acid) that irritate sensitive skin and can cause corneal damage upon accidental splash.
- Avoid application under scorching mid-day sun: High surface temperatures (above 35°C) cause the liquid carrier to flash evaporate before the acid can migrate into deep rust pits, producing an unreactive, chalky film.
- Never apply converter during high humidity or rain: Rainwater will wash away active chemical compounds before they cross-link. Ensure at least 24 hours of dry weather following application.
- Mask balcony floor tiles and stone sills: Acidic drips will etch marble, granite, or vitrified tiles, leaving permanent cloudy stains. Lay heavy drop cloths or plastic sheeting beneath the railing.
- Never pour leftover converter back into the original container: Once the liquid contacts rusty brushes, it starts reacting. Pouring contaminated solution back will spoil the entire bottle.
Step-by-Step Practical Execution Guide
Follow these 11 precise steps to chemically convert rust and protect your balcony railings for years:
-
Step 1: Inspect and Diagnose the Railing Surface
Walk the length of the railing and tap suspicious joints with a small screwdriver. Rust converter is designed specifically for tight, stable surface rust and shallow pitting. If a lower rail or base post has rusted through with structural holes, it must be mechanically patched or re-welded before chemical painting. -
Step 2: Scrape Away Loose Flakes and Blistered Paint
Vigorously scrub the ironwork with a stiff carbon-steel wire brush. Dislodge all loose, crunchy rust crust and peeling old paint. The converter must reach firmly adhered rust; spraying over loose scales only binds crumbs that will flake away later. -
Step 3: Hand-Sand Tight Details With Emery Paper
Wrap 80-grit emery paper around ornamental scrolls, twists, and welded seam intersections. Sand down feather edges where intact paint meets rusted patches so the eventual transition is seamless. -
Step 4: Wipe Away Residual Dust and Greasy Film
Blow out grit from crevices and wipe the entire railing thoroughly with a dry rag. If the metal has greasy fingerprints or traffic soot, wipe with a rag moistened with mineral turpentine and allow it to dry completely. -
Step 5: Decant the Converter Into a Working Cup
Shake the product container vigorously for 60 seconds. Pour only the amount needed for the immediate section into a disposable plastic cup or paint pot. Never dip your brush directly into the main supply bottle. -
Step 6: Apply a Uniform, Thin Chemical Coat
Dip your dedicated brush into the solution and brush onto the rusted metal in a smooth, continuous layer. Avoid slathering heavy puddles; a thin, even coat allows the chemical to penetrate deep into microscopic metal fissures without sagging or running. -
Step 7: Saturate Weld Pockets and Scroll Intersections
Stipple the brush tips deep into scroll clefts, bolt holes, and bottom rail joints where moisture habitually gathers. Ensure full wet coverage across every unpainted, oxidized surface. -
Step 8: Monitor the Chemical Color Transition
Within 15 to 30 minutes, observe the milky or clear liquid react with the ferrous surface. The rust will visibly transform into a deep indigo, navy blue, and finally a dense, matte blue-black protective shield. -
Step 9: Allow Undisturbed Curing Time
Let the converted surface cure according to manufacturer specifications (typically 12 to 24 hours). Do not disturb, touch, or expose the damp surface to dew during this critical polymerization period. -
Step 10: Apply a Second Coat on Stubborn Pitted Zones
If any reddish-brown rust streaks remain visible through the black film after 4 hours, apply a second light coat over those stubborn spots and allow another full cure cycle. -
Step 11: Apply Primer and Outdoor Enamel Topcoat
Once completely black and dry to the touch, apply a coat of red oxide or zinc phosphate metal primer, followed by two coats of premium exterior gloss enamel (such as Asian Paints Apcolite or Berger Luxol) for showroom-grade gloss and UV protection.
💡 Pro-Tips From the Field
- Morning application yields the best curing window: Apply rust converter between 7:30 AM and 10:00 AM on clear days. This gives the liquid ample moderate-temperature hours to react fully before scorching mid-day heat or evening coastal condensation arrives.
- Converter requires rust to work properly: Do not brush converter over clean, shiny bare steel. Rust converters rely chemically on iron oxides to react; applying them over bare, rust-free steel leaves a gummy, unreacted film that weakens paint adhesion.
- Use a foam craft sponge for round balusters: Cut a small slit into a high-density foam sponge, pour converter onto it, and wrap it around cylindrical railing bars. Pulling it downward coats round pipes in seconds with zero dripping.
- Never skip the final paint coat: While the converted black magnetite film stops active oxidation, it is not UV-stable or impervious to perpetual standing rain. Always seal it under two coats of exterior oil-based enamel.
Troubleshooting Common Mistakes
- "The converted black film is peeling off in sheets after a few days"? This occurs when the solution was painted directly over loose, flaky rust crust or greasy oil without wire brushing. The chemical converted the top crust, but the crust itself lacked structural adhesion to the base metal. Scrape back to firmly anchored metal and reapply.
- "The chemical dried clear or streaky without turning black"? This indicates either the solution was applied over intact paint/clean steel with zero rust, or the product had expired and lost its acidity. Lightly scuff the clear film with sandpaper and wipe clean.
- "The enamel topcoat wrinkled or bubbled after application"? You applied oil-based paint before the rust converter had fully cured. Trapped moisture and continuing acid reactions create off-gassing that lifts paint films. Always wait 24 full hours before applying topcoats.
Conclusion & Related Reads
Transforming rusted balcony railings doesn't have to mean days of grueling mechanical grinding. By pairing targeted wire brushing with modern chemical rust converter primer, you turn rust into a resilient protective armor that seals out moisture and extends the life of your metalwork for seasons to come.
Explore more metal care, welding, and outdoor maintenance tutorials on CarpenterWala:

Rajesh Sharma
Verified SpecialistMaster Carpenter & Woodwork Consultant
Over 15 years of custom woodworking, furniture restoration, and modular interior fittings experience in Bangalore.
⚖️ DIY vs. Hiring a Professional: When to Call an Expert
✓ Safe to DIY
- Minor screw tightening or loose hinge lubrication
- Basic component replacement with matching dimensions
- Routine surface touch-ups and non-structural adjustments
⚠️ Hire a Verified Pro
- Structural woodwork warping, masonry drilling, or rotted frames
- High electrical voltages, MCB trips, or water line pipe bursts
- Multi-room installations requiring specialized power equipment
💬 Comments (0)