📑 Table of Contents (9 sections) — Tap to expand
⚡ Quick Takeaway (Position-0 Summary)
To clear a blocked bathroom floor drain full of hair, lift out the drain grating (jaali) first and physically remove visible hair clumps, use a bent wire or drain hair-removal tool to pull out deeper buildup, flush with hot water and a baking soda-vinegar treatment, then replace the grating and test drainage.
The Anatomy of a Clogged Indian Bathroom Floor Drain
Water pooling around your feet in the shower, or a bathroom floor drain that gurgles and drains noticeably slower than it used to. This is one of the most universally relatable bathroom problems in Indian homes, and the cause is almost always the same culprit: hair, combined with soap scum that binds it together into a dense, water-resistant clump right at or just below the drain opening.
Every time someone showers, washes their hair, or even just walks across a wet bathroom floor, loose hair strands wash toward the floor drain. Individually, these would mostly flow through without issue, but combined with soap residue (which, especially with hard water common across much of India, doesn't fully rinse away and instead forms a sticky scum), hair strands bind together into an increasingly dense mat that narrows the drain opening and, eventually, blocks it substantially. Because the floor drain is low-traffic in terms of regular cleaning attention — unlike a kitchen sink that gets wiped and used constantly in view — this buildup often goes unnoticed until it's already significantly restricting flow.
The good news is that this is one of the most physically straightforward clogs to clear, since in most cases the blockage is sitting right at or very near the surface, fully accessible once you lift the drain cover.
What You Will Need
Gather these basic household tools and cleaning supplies before opening the floor drain:
Essential Tools:
- Flathead screwdriver: Or similar flat blade tool to safely pry up the drain grating (jaali).
- Rubber gloves: Essential for hygiene when handling stagnant water and hair clumps.
- Bent wire or hair-removal tool: A straightened wire coat hanger with a small hook bent at the end.
- Torch / flashlight: To illuminate deep inside the dark Nahani trap collar.
- Small waste bucket: To directly deposit pulled hair clumps and avoid re-clogging.
Materials & Consumables:
- Baking soda: Half a cup for pipe wall deodorizing and residue lifting.
- White vinegar: Half a cup to create an effervescent cleaning reaction.
- Hot water: 1 to 2 liters of steaming hot tap water.
- Old toothbrush or nylon brush: For scrubbing the slotted grating clean.
⚠️ Critical Safety Warnings
Read this before you start:
- Wear protective rubber gloves throughout: You will be handling decayed hair, slimy soap scum, and bacteria-laden stagnant water. Gloves prevent bacterial contamination, especially if you have micro-cuts or hangnails.
- Watch out for sharp metal jaali edges: Stamped stainless steel floor drain grates often have razor-sharp stamped edges or burrs that can easily slice bare fingers when prying them open.
- Never ram wire hooks violently into trap bends: Floor drain traps beneath the slab can have brittle PVC joints or lead-poured caulking in older buildings. Aggressive prodding risks piercing or dislodging pipe seals beneath the tile floor.
- Check for dry trap sewer odor: If a strong sewage smell persists even after clearing hair buildup, the internal water trap barrier may have evaporated. Refill the trap with fresh water rather than assuming an ongoing blockage.
Step-by-Step Practical Execution Guide
Follow these 10 practical steps to safely extract hair mats and restore maximum floor drainage flow:
-
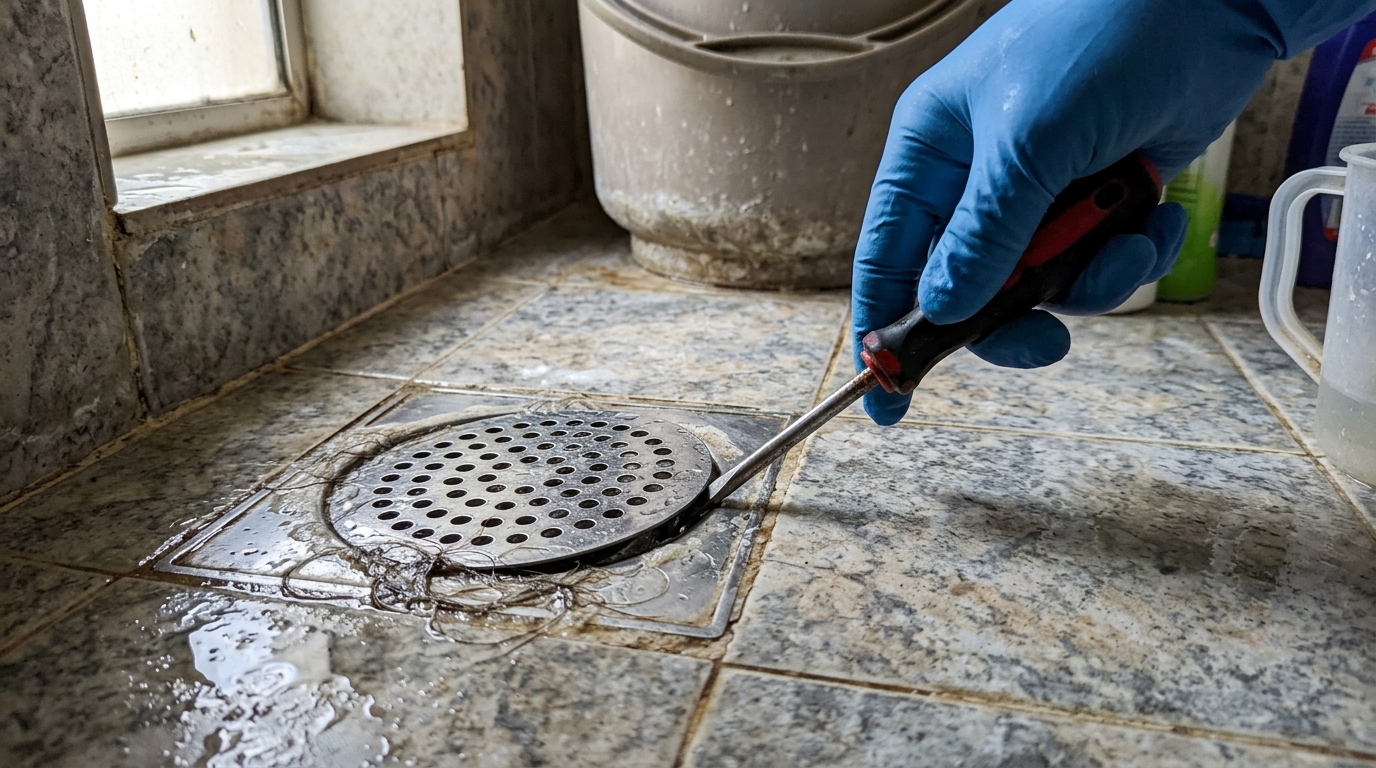
Step 1: Lift Out the Drain Grating (Jaali)
Using a flathead screwdriver or paint scraper tip, carefully pry up the round stainless steel drain cover (jaali) from the floor recess and set it aside on a bathroom tile. -
Step 2: Inspect the Visible Buildup
Shine your torch directly down into the drain opening. In almost every case, you will immediately spot a thick ring of matted hair, soap froth, and lint wrapped around the central funnel or seated right at the surface. -
Step 3: Remove Visible Hair Clumps by Hand
Wearing rubber gloves, reach into the collar and grip the visible hair mat. Pull it out slowly in a circular motion so it stays in one cohesive clump, and toss it immediately into your waste bucket. -
Step 4: Use a Bent Wire for Deeper Buildup
For hair masses lodged just around the trap bend, insert your homemade wire hook tool. Twist the wire gently in full 360-degree rotations to snag hair fibers, then pull upward with steady, gentle tension. -
Step 5: Repeat Until No More Hair Comes Out
Re-insert the hook tool two or three times at different angles until it comes out completely clean, confirming the main physical restriction has been cleared. -
Step 6: Scrub the Grating Itself
Take your old toothbrush, dip it in dish soap or vinegar, and scrub both the top and underside of the stainless steel jaali slots. Soap scale trapped in the grate holes alone can restrict 30% of water flow. -
Step 7: Flush With Hot Water
Pour a kettle or bucket of steaming hot water directly into the drain throat. The rush of hot water washes away loosened soap grease and microscopic lint particles down into the main waste stack. -
Step 8: Follow With a Baking Soda and Vinegar Treatment
Pour half a cup of baking soda into the drain cup, followed immediately by half a cup of white synthetic vinegar. Let the effervescent bubbling foam dissolve stubborn biofilm and deodorize the trap for 20 to 30 minutes, then rinse with warm water. -
Step 9: Replace the Drain Grating
Align the cleaned grating back into its recessed floor collar, pressing it flat so it sits flush with the tile surface without wobbling. -
Step 10: Test With Running Water
Turn the shower on full blast or pour a full 15-liter bucket of water across the bathroom floor. Watch the drainage speed: water should vanish swiftly into the drain without pooling around your ankles.
💡 Pro-Tips From the Field
- Implement a 60-day preventive jaali cleaning: Don't wait until bathroom water floods the doorway. Lifting and clearing the jaali every two months takes under 2 minutes and prevents deep compacted blockages completely.
- Install an aftermarket silicone hair-catcher: Inexpensive silicone drain catcher covers (₹99 on Amazon) catch 95% of loose hair before it ever slips through the stainless steel slots.
- Brush hair before showering: A quick 30-second brushing before entering the shower removes loose, shed hair dry, keeping it out of the wastewater system entirely.
Troubleshooting Common DIY Mistakes
- "I removed visible hair but drainage is still slow."
There is likely additional buildup further down than your wire tool reached, or soap scum residue coating the pipe walls beyond the visible clog. Follow through with the full baking soda, vinegar, and hot water treatment (Steps 7-8), which addresses buildup beyond what's physically retrievable by hand or hook. - "Water drains fine now but there's a lingering bad smell."
If the floor drain isn't used very often (a guest bathroom, for instance), this is likely the drain's water trap running dry rather than remaining blockage. Simply pouring a jug of plain water down the drain to refill the trap's water seal often resolves this smell within minutes. - "I used a wire tool and now there's a small leak visible beneath the drain."
This suggests the wire was pushed with too much force and may have disturbed a pipe joint beneath the drain. Check the connection just below the drain opening, and if you can access it, tighten or reseal following the guidance in our leaking pipe joint guide; if it's not easily accessible, this may need a plumber's assessment.
Conclusion & Related Reads
A hair-clogged bathroom floor drain is one of the most physically direct clogs to clear, since the buildup is almost always right at or near the accessible surface — a bit of regular grating cleaning going forward keeps this from becoming a recurring hassle.
Related reads on CarpenterWala:

Rajesh Sharma
Verified SpecialistMaster Carpenter & Woodwork Consultant
Over 15 years of custom woodworking, furniture restoration, and modular interior fittings experience in Bangalore.
⚖️ DIY vs. Hiring a Professional: When to Call an Expert
✓ Safe to DIY
- Minor screw tightening or loose hinge lubrication
- Basic component replacement with matching dimensions
- Routine surface touch-ups and non-structural adjustments
⚠️ Hire a Verified Pro
- Structural woodwork warping, masonry drilling, or rotted frames
- High electrical voltages, MCB trips, or water line pipe bursts
- Multi-room installations requiring specialized power equipment
💬 Comments (0)