📑 Table of Contents (9 sections) — Tap to expand
⚡ Quick Takeaway (Position-0 Summary)
To fix a leaking washing machine inlet pipe at the tap, shut off the tap supply, unscrew the inlet hose connector, check the rubber washer inside the connector for wear and replace it, wrap the tap's threaded spout with Teflon tape if needed, then reattach the hose hand-tight plus a quarter turn and test for leaks.
The Anatomy of an Under-Pressure Washing Machine Tap Leak
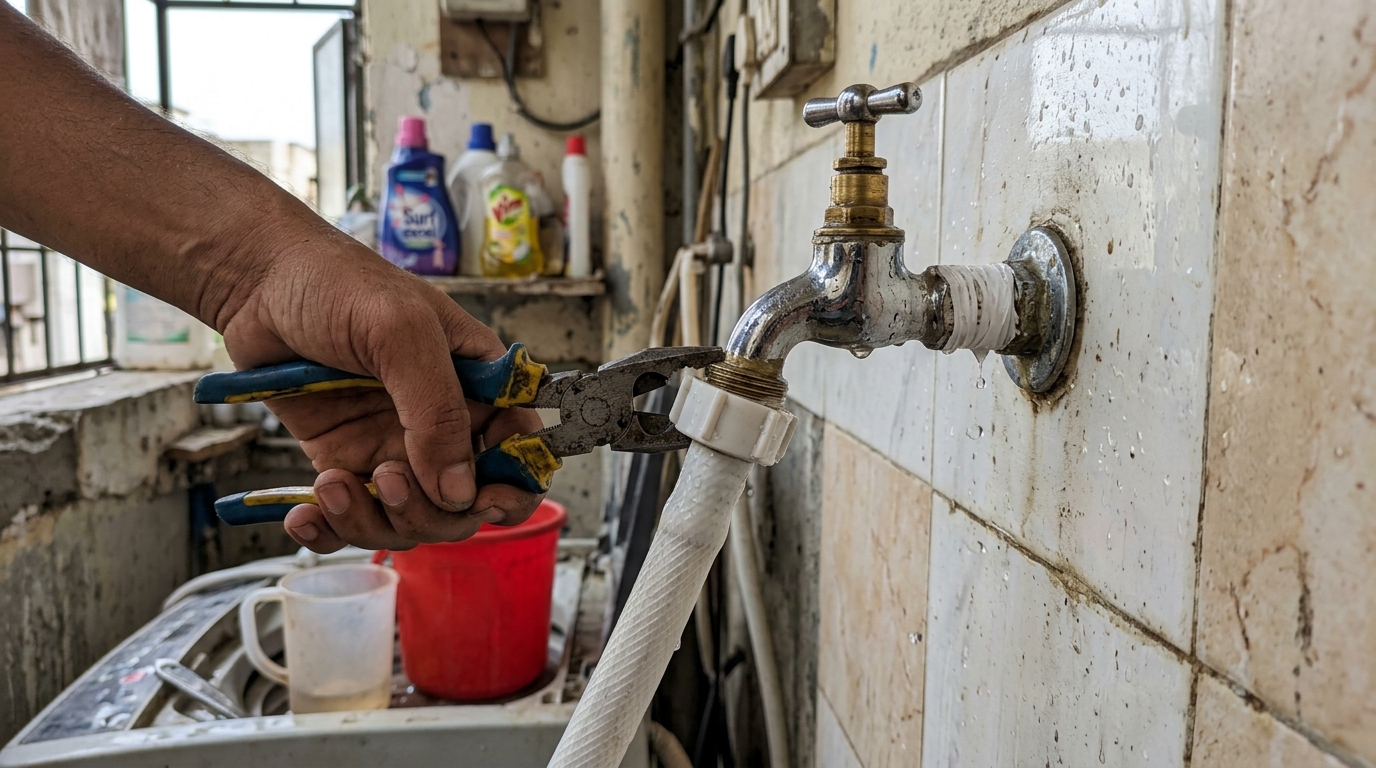
Water dripping or spraying from where your washing machine's inlet hose connects to the tap, often noticed as a growing damp patch on the floor near your washing machine, or water actively running down the wall behind it. This connection point — where the machine's flexible inlet hose screws onto your water tap — relies on a simple but important rubber washer seal inside the hose's connector fitting, and this is almost always where the leak originates rather than anywhere deeper in the machine itself.
Washing machine inlet connections see a particular kind of stress that regular tap connections don't: the hose is typically left connected and under water pressure continuously (since most people don't disconnect it between washes), and the connector experiences slight vibration every time the machine runs through its fill and spin cycles. Over months and years, this combination of sustained pressure and repeated vibration gradually wears down the internal rubber washer, and once it's compressed, cracked, or otherwise degraded, it can no longer create the watertight seal it's designed for. Hard water mineral deposits can also build up at this connection point over time, preventing the washer from seating evenly even if it's not yet significantly worn.
What You Will Need
Gather these essential tools and materials before unscrewing the hose:
Essential Tools:
- Adjustable wrench or groove-joint pliers: For loosening and gently snugging the collar nut.
- Catch bucket or dry shop towels: To catch trapped residual line water upon disconnection.
- Torch / flashlight: To clearly inspect internal threads and washer seating surfaces.
Materials & Consumables:
- Replacement rubber inlet hose washer: Standard 3/4-inch BSP washing machine washer (available in hardware multi-packs).
- PTFE Teflon thread tape: For creating an airtight barrier over the brass bib tap threads.
- Clean microfiber cloth: For wiping away mineral grit and old washer residue.
⚠️ Critical Safety Warnings
Read this before you start:
- Isolate water supply completely before opening: Always turn the dedicated wall tap or angle stop cock completely clockwise to zero flow. Disconnecting a pressurized inlet hose will trigger an immediate high-pressure wall spray.
- Prevent water-to-electricity shock hazards: Washing machine 16A power sockets are almost always mounted on adjacent utility walls. Unplug the machine cord and keep electrical boxes bone dry throughout the repair.
- Inspect for chronic wall dampness: If the connection has been misting or dripping unnoticed for weeks, examine skirting boards and adjacent masonry for hidden efflorescence or mold growth.
- Keep machine de-energized during work: Even though you are handling plumbing rather than electrical motors, unplugging the power supply provides essential peace of mind in damp utility spaces.
Step-by-Step Practical Execution Guide
Follow these 11 practical steps to reseal or replace your washing machine inlet connection:
-
Step 1: Shut Off the Tap Supply
Turn off the dedicated water tap feeding the washing machine inlet hose completely. If your setup features a 2-in-1 bib cock or quarter-turn angle valve, rotate the knob clockwise until water flow ceases. -
Step 2: Unplug the Washing Machine Power Cord
Pull the 16A power plug from the wall socket to completely eliminate electrical shock hazards while handling plumbing in a damp utility area. -
Step 3: Position a Catch Towel or Bucket
Place an old absorbent towel or small plastic bucket directly underneath the tap connection to capture the 100ml to 200ml of trapped pressurized water that drains out when the joint breaks. -
Step 4: Unscrew the Inlet Hose Connector
Firmly grip the ribbed plastic or brass inlet connector nut. Turn it counterclockwise by hand. If it is locked tight with dried limescale, gently apply adjustable pliers to break the initial friction bond. -
Step 5: Inspect the Internal Rubber Washer
Peel the rubber sealing washer out from the recessed groove inside the female connector. Inspect it closely under light: look for hardening, tears, crushed flat spots, or perimeter splits. -
Step 6: Clean the Connector and Tap Spout Threads
Take your clean cloth and wipe the male brass threads of the tap spout and the internal plastic hose threads. Scrape away encrusted calcium deposits and shreds of old tape so the new seal sits perfectly flat. -
Step 7: Seat the Fresh Replacement Rubber Washer
Press a brand-new 3/4-inch rubber or silicone sealing washer flat into the bottom of the connector cup. Ensure it is seated squarely against the internal lip without buckled edges or pinching. -
Step 8: Apply Teflon Tape to the Tap Threads (If Needed)
Wrap 3 to 4 turns of white Teflon tape clockwise around the male threads of the tap spout. The tape lubricates the threads and seals micro-imperfections in the brass casting. -
Step 9: Reconnect the Hose to the Tap
Carefully align the hose collar with the tap spout to avoid cross-threading. Thread the plastic nut clockwise by hand until it seats snugly against the rubber washer. Add just one gentle quarter-turn with pliers — do not overtighten and crack the plastic nut. -
Step 10: Turn the Tap Back On and Check for Leaks
Slowly reopen the water tap to full pressure. Watch the perimeter seam of the plastic nut intently. Wipe it with dry toilet tissue: if the paper remains crisp and bone dry, your seal is watertight. -
Step 11: Plug In and Run a Test Fill Cycle
Plug the washing machine back into the wall socket. Start a quick rinse-and-spin cycle to activate the internal solenoid intake valve. Inspect the connection while water is actively pulsing through the hose.
💡 Pro-Tips From the Field
- Preventive washer replacement every 2 years: Rubber washers vulcanize and turn brittle under constant city water line pressure. Swapping the washer every 24 months costs under ₹20 and prevents unexpected utility floods.
- Turn the tap off when leaving home for holidays: If you are traveling for more than 48 hours, shut off the dedicated washing machine tap. Relieving continuous line pressure safeguards your apartment from sudden burst hoses.
- Inspect the corrugated braided hose body: If you observe blistering, discoloration, or hardening along the flexible hose wall itself, replace the entire inlet hose assembly immediately before a catastrophic burst occurs.
Troubleshooting Common DIY Mistakes
- "I replaced the washer but it's still leaking at the same spot."
Check that the washer is genuinely seated flat and centered inside the connector, not twisted or pinched. Also inspect the tap's spout for any damage or an irregular surface that might prevent even a new washer from sealing fully. - "I tightened it very firmly and now the connector feels cracked."
Stop applying force immediately. A cracked connector fitting needs full replacement, since no amount of washer quality will compensate for a physically damaged housing. Source a matching replacement connector or inlet hose. - "Leak seems to be coming from higher up the hose, not the tap connection."
This indicates the hose itself has a crack or weak point along its length rather than a connector/washer issue. This needs a full hose replacement rather than just addressing the tap-end connection.
Conclusion & Related Reads
A leaking washing machine inlet connection is a quick, inexpensive fix once you've confirmed it's the washer at fault — a few minutes of work and a cheap replacement part genuinely prevents what could otherwise become ongoing water damage to your floor and walls.
Related reads on CarpenterWala:

Rajesh Sharma
Verified SpecialistMaster Carpenter & Woodwork Consultant
Over 15 years of custom woodworking, furniture restoration, and modular interior fittings experience in Bangalore.
⚖️ DIY vs. Hiring a Professional: When to Call an Expert
✓ Safe to DIY
- Minor screw tightening or loose hinge lubrication
- Basic component replacement with matching dimensions
- Routine surface touch-ups and non-structural adjustments
⚠️ Hire a Verified Pro
- Structural woodwork warping, masonry drilling, or rotted frames
- High electrical voltages, MCB trips, or water line pipe bursts
- Multi-room installations requiring specialized power equipment
💬 Comments (0)