📑 Table of Contents (7 sections) — Tap to expand
⚡ Quick Takeaway (Position-0 Summary)
To fix a dripping quarter-turn tap, recognize that modern 90-degree taps do not use traditional rubber washers — they rely on an internal brass and ceramic disc spindle cartridge. Shut off the under-sink angle valve, pry off the decorative index cap, unscrew the hidden Allen grub screw to remove the handle, unscrew the brass cartridge using an adjustable spanner, replace the whole ceramic cartridge with an exact matching replacement, and reassemble for a permanent leak-free seal.
The Myth of the Rubber Washer in Modern 90-Degree Faucets
That rhythmic drip... drip... drip echoing from your bathroom washbasin or kitchen sink faucet late at night isn't just an irritating soundtrack — it wastes thousands of liters of treated overhead tank water every month. When faced with a dripping tap, most homeowners instinctively remember classic DIY advice: "Just open the tap and change the little black rubber washer."
However, if your tap operates with a slick, effortless 90-degree quarter-turn motion (popularized across India by brands like Jaquar, Kohler, Hindware, Cera, and Essco), disassembling it will reveal a surprise: there is no traditional rubber jumper washer inside.
Instead, modern quarter-turn faucets utilize high-precision ceramic disc cartridges (spindles). Inside each brass cartridge, two diamond-hard, laser-polished alumina ceramic discs slide against each other. One disc remains stationary while the other rotates 90 degrees to align water ports. While impervious to thermal erosion, ceramic discs are susceptible to hard groundwater mineral scaling, pipe sediment grit, and limescale buildup. When mineral deposits score the ceramic surfaces or jam the discs open, water bypasses the seal. Fixing it requires replacing the internal cartridge assembly rather than searching in vain for a rubber washer.
What You Will Need
Prepare these basic plumbing hand tools before shutting off your water supply:
- Replacement Ceramic Disc Cartridge: Exact replacement matching your tap brand (take your old cartridge to a sanitaryware store for 100% spline and thread matching).
- Adjustable Spanner Wrench: 8-inch or 10-inch smooth-jaw wrench for unscrewing the brass cartridge hex collar.
- Hex (Allen) Key Set: Metric sizes (typically 2.5mm or 3mm) to release the handle locking grub screw.
- Precision Flathead Screwdriver: Or craft knife blade to gently pry off the decorative hot/cold index button.
- White Synthetic Vinegar & Old Toothbrush: For dissolving calcium and magnesium limescale crust inside the tap cavity.
- Microfiber Cloth or Washbasin Drain Plug: To block the sink drain hole and prevent losing tiny grub screws.
⚠️ Critical Safety Warnings
Read this before you start:
- Always isolate water pressure before unscrewing: Disassembling a pressurized tap will shoot an uncontrollable geyser of water across your bathroom ceiling, causing immediate electrical short-circuits or flooding. Shut the wall angle valve and open the tap to confirm zero pressure.
- Plug the sink basin drain immediately: The microscopic grub screws holding tap handles bounce effortlessly down open drain pop-ups. Always spread a thick towel over the sink basin before touching any tool.
- Never force a seized cartridge with brutal torque: Wall-mounted concealed taps or deck mixers can twist inside tile wall junctions if wrench force is excessive, snapping internal copper pipes. If stubborn, dissolve scale with white vinegar first.
- Never hammer or force an ill-fitting cartridge: Cartridges feature delicate ceramic plates. Forcing a mismatched model into the brass housing cracks the ceramic core or distorts the tap body casting.
Step-by-Step Practical Execution Guide
Follow these 11 precise steps to extract, descale, and install a brand-new ceramic disc cartridge:
-
Step 1: Shut Off the Dedicated Angle Stop Valve
Look beneath the washbasin or counter. Turn the small chrome angle valve clockwise until it stops. Turn the tap handle to the fully open position to bleed trapped residual pressure and verify that water has completely stopped flowing. -
Step 2: Drape the Basin and Cover the Drain Hole
Lay a dry hand towel or rag across the ceramic sink basin, stuffing a corner directly into the drain waste hole. This catches loose screws and protects porcelain finishes from accidental tool drops. -
Step 3: Pop Off the Concealed Index Cap
Inspect the tap handle. On lever taps, look underneath the lever tip or behind the neck for a small plastic cap (often marked blue/red or blank chrome). Gently wedge the thin tip of a flathead screwdriver or utility blade underneath and pry the cap free. -
Step 4: Back Out the Recessed Allen Grub Screw
Shine a flashlight into the small revealed hole. You will spot a tiny hexagonal socket screw. Insert a 2.5mm or 3mm Allen key until firmly seated. Turn counterclockwise 3 to 4 turns (you don't need to remove it completely) to release the internal spline grip. -
Step 5: Lift Off the Faucet Handle Body
Pull the metal handle straight upward with a gentle rocking motion. If limescale has bonded the handle to the brass spindle, tap the handle base lightly with the wooden handle of a screwdriver to break the mineral bond. -
Step 6: Unscrew the Decorative Shroud Collar
Beneath the handle, unscrew the smooth, dome-shaped chrome vanity cover ring counterclockwise by hand. If it slips between damp fingers, wrap a wide rubber band around it for friction grip. -
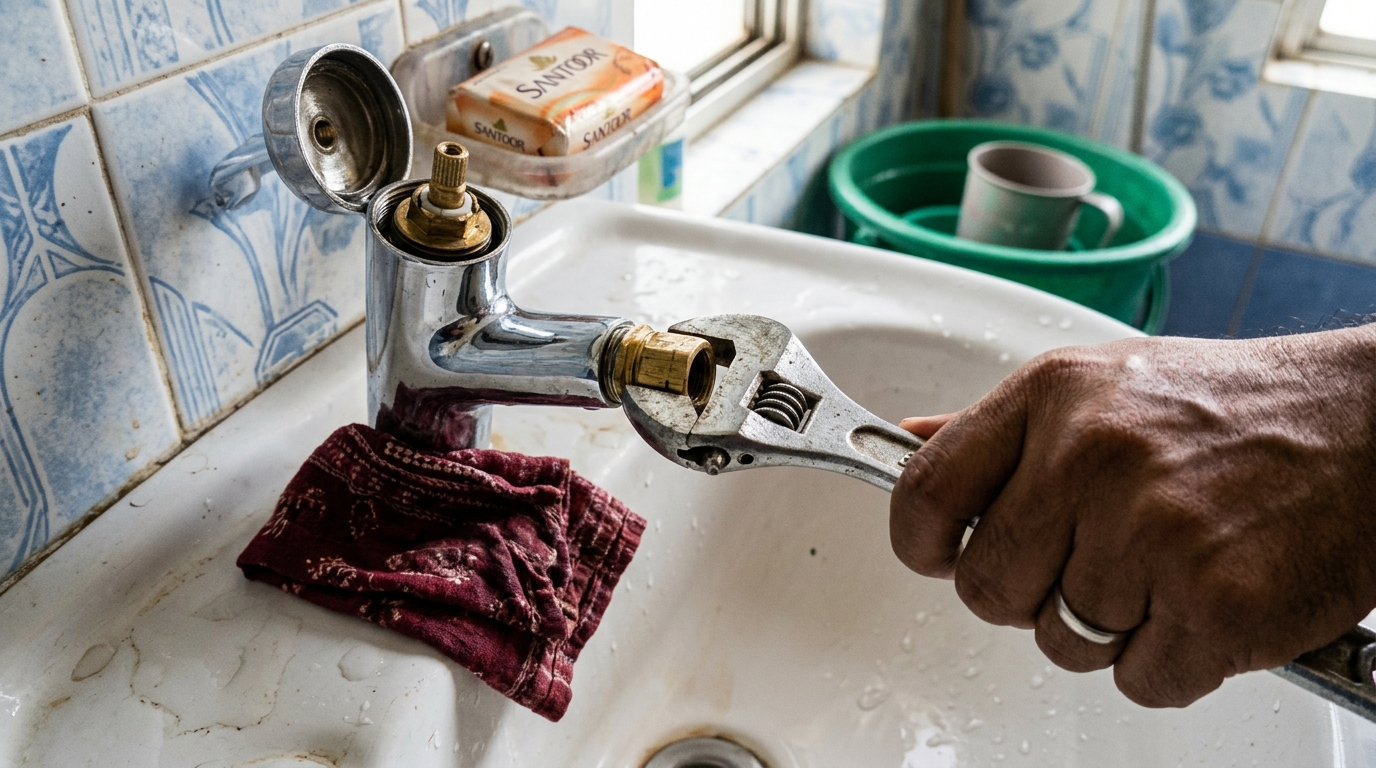
Step 7: Back Out the Brass Cartridge With an Adjustable Spanner
Adjust your smooth-jaw wrench to fit snugly onto the flat hexagonal flanks of the brass cartridge bonnet. Turn counterclockwise with firm, steady leverage. Once loosened, spin the cartridge completely out of the faucet body. -
Step 8: Clean Calcium Scale From the Internal Valve Seat
Peer inside the hollow faucet chamber. You will likely see white, crusty calcium and magnesium buildup. Dip an old toothbrush into white vinegar and scrub the internal brass threads and base seating rim clean, wiping out dislodged debris with a cloth. -
Step 9: Confirm Exact Cartridge Match
Compare your old cartridge side-by-side with your replacement: count the gear teeth on the top brass spline (commonly 18, 20, or 24 teeth), verify the overall millimeter length, and note the base rubber sealing gasket profile. Also confirm rotation direction (clockwise vs. counterclockwise to open). -
Step 10: Thread in the New Ceramic Cartridge
Ensure the bottom silicone O-ring gasket on the new cartridge is properly seated. Thread the cartridge clockwise into the faucet body by hand to prevent cross-threading. Snug it down firmly with your wrench until seated solid — do not apply extreme brute force. -
Step 11: Reassemble Handle and Restore Full Pressure
Screw back the chrome decorative dome shroud. Slide the handle onto the brass splines, tighten the Allen grub screw securely, and press the plastic cap back into place. Slowly reopen the under-sink angle valve, exercise the tap handle through its 90-degree sweep, and admire your bone-dry spout.
💡 Pro-Tips From the Field
- Clockwise vs. Counterclockwise rotation: In pair mixers (hot & cold), one cartridge opens clockwise while the companion opens counterclockwise so both handles pull outward symmetrically. Check the color ring (red or blue) at the base of the replacement spindle cartridge before buying.
- Always bring the old spindle to the local sanitaryware dealer: There are over 30 different spindle variations across Jaquar, Hindware, Parryware, and local Indian brands. Taking your physical cartridge to the hardware counter guarantees a millimeter-perfect fit.
- Silicon grease on the base O-ring: Smear a tiny dab of food-grade silicone grease (plumber's grease) onto the rubber seal at the base of the new cartridge before screwing it in. This prevents the rubber from twisting or pinching during final tightening.
- Unscrew the spout aerator filter after installation: When water is turned back on, pipe sediment dislodged during work can rush into the spout nozzle. Unscrew the aerator screen, flush the tap for 30 seconds, and reinstall the filter.
Troubleshooting Common Mistakes
- "The new cartridge is installed, but water now drips faster than before"? The base silicone gasket was pinched out of alignment or dirt grit remained trapped on the internal brass floor. Unscrew the cartridge, flush the internal cavity with water, ensure the bottom rubber gasket sits flat in its groove, and re-torque.
- "The handle now turns in the wrong direction to open"? You installed a 'Cold' cartridge (clockwise close) in place of a 'Hot' cartridge (counterclockwise close), or vice-versa. Modern modular cartridges allow you to disassemble the internal stop clip and rotate the brass spindle 180 degrees, or simply swap it for the opposite-handed spindle.
- "The tap handle slips or won't grip the cartridge stem"? The number of spline teeth does not match (e.g., trying to fit a 20-tooth Jaquar handle onto an 18-tooth local spindle) or the grub screw was not aligned with the flat notch of the stem. Ensure exact tooth count compatibility.
Conclusion & Related Reads
Dripping quarter-turn taps don't require guesswork or rubber washer searches. By identifying the internal ceramic disc cartridge spindle, sourcing an exact manufacturer replacement, and clearing away hard-water mineral scale, you can restore smooth, effortless operation and stop water waste dead in its tracks.
Explore more bathroom maintenance, plumbing repairs, and hardware guides on CarpenterWala:

Rajesh Sharma
Verified SpecialistMaster Carpenter & Woodwork Consultant
Over 15 years of custom woodworking, furniture restoration, and modular interior fittings experience in Bangalore.
⚖️ DIY vs. Hiring a Professional: When to Call an Expert
✓ Safe to DIY
- Minor screw tightening or loose hinge lubrication
- Basic component replacement with matching dimensions
- Routine surface touch-ups and non-structural adjustments
⚠️ Hire a Verified Pro
- Structural woodwork warping, masonry drilling, or rotted frames
- High electrical voltages, MCB trips, or water line pipe bursts
- Multi-room installations requiring specialized power equipment
💬 Comments (0)