📑 Table of Contents (9 sections) — Tap to expand
⚡ Quick Takeaway (Position-0 Summary)
To fix a shower head with low pressure from hard water scaling, unscrew the shower head (or leave attached if removable nozzle plate), soak it in a vinegar solution for 30 minutes to a few hours, scrub the nozzle holes with an old toothbrush or needle to dislodge mineral deposits, rinse thoroughly, and reattach to test the restored spray pattern.
The Chemistry of Low Shower Pressure: Hard Water Scale Accumulation
Your shower head that used to deliver a strong, even spray now sputters out thin, uneven streams, with some holes completely blocked while others spray at odd angles. This is one of the most common bathroom fixture complaints across India, and the cause is almost always the same: hard water mineral deposits — primarily calcium and magnesium — gradually building up and crystallizing inside the tiny nozzle holes that create your shower's spray pattern.
Hard water is extremely common across large parts of India, and every time water passes through your shower head, it leaves behind microscopic traces of these dissolved minerals. Individually, these traces are nothing, but over weeks and months of regular use, they accumulate and harden into a chalky, white-ish deposit that physically narrows or completely blocks the tiny nozzle openings. Shower heads with especially fine, decorative nozzle patterns (common in modern rain-shower and multi-function designs) are particularly vulnerable since their openings are smaller to begin with, giving mineral buildup less room to accumulate before causing a noticeable pressure or pattern problem.
The good news is that this is one of the most satisfying "really did just need cleaning" fixes in home plumbing — no parts to buy, no tools beyond a wrench, just vinegar and some patience.
What You Will Need
Prepare these basic cleaning supplies before tackling your shower head:
Essential Tools:
- Adjustable wrench: Only needed if the shower head is torqued tight onto the arm.
- Old toothbrush: Medium or firm nylon bristles to scour dislodged mineral crust.
- Thin sewing needle or safety pin: For gently poking open stubborn individual silicone orifices.
- Sturdy zip-top plastic bag or plastic bowl: Sized to submerge the shower head face.
Materials & Consumables:
- White synthetic vinegar (5% acetic acid): 500ml to 1 liter for descaling.
- Fresh tap water: For diluting or flushing residual acid.
- Heavy rubber band or zip-tie: For securing the vinegar bag around fixed shower heads.
- Microfiber cloth: For buffing chrome finishes to a brilliant shine.
⚠️ Critical Safety Warnings
Read this before you start:
- Never gouge soft silicone nozzles with brute force: Modern rain showers feature flexible elastomeric nozzles. Poking needles too aggressively can tear or stretch silicone orifices, causing permanent sideways spraying.
- Check compatibility on electronic or LED showers: If your shower head contains built-in LED temperature indicators, digital flow displays, or internal turbine generators, avoid submerging electronic housings in acid. Soak only the faceplate.
- Ensure adequate bathroom ventilation: Concentrated warm acetic acid vapor can be pungent and irritate eyes in small, closed bathroom cabins. Keep the exhaust fan running or window cracked.
- Handle detached shower heads over padded towels: Wet chrome-plated ABS or ceramic shower heads become very slippery. Disassemble over a folded towel in the basin to avoid costly chips on bathroom floor tiles.
Step-by-Step Practical Execution Guide
Follow these 10 practical steps to dissolve hardened limescale and restore full-force spray power:
-
Step 1: Decide Whether to Remove the Shower Head
Inspect the fixture connection. If the shower head unscrews easily from the flexible hose or overhead wall arm by hand, removing it allows for a complete, effortless bowl soak. If it is fixed or tightly seized to the wall pipe, treat it in place using the plastic bag method. -
Step 2: Remove the Shower Head (If Accessible)
Wrap a rag around the chrome swivel nut to prevent tool gouges, then turn counterclockwise with an adjustable wrench. Spin it off the threaded arm, taking care not to lose the tiny black mesh washer filter inside the inlet collar. -
Step 3: Submerge the Shower Head in White Vinegar
Place the shower head face-down in a plastic container or deep bowl. Pour pure white synthetic vinegar until the entire front nozzle plate is completely submerged. -
Step 4: Alternative In-Place Bag Method (For Fixed Showers)
If leaving the overhead arm fixed, fill a durable plastic bag halfway with white vinegar. Slide the bag up over the shower head until all nozzles are submerged in liquid, then wrap a heavy rubber band tightly around the neck to secure it in place. -
Step 5: Allow 30 Minutes to 2 Hours of Undisturbed Soaking Time
Let the mild acetic acid break down the alkaline calcium carbonate ($CaCO_3$) bonds. For light scaling, 30 to 45 minutes is sufficient; for thick borewell crust, leave it soaking for 2 to 3 hours or overnight. -
Step 6: Scrub the Nozzle Face Thoroughly
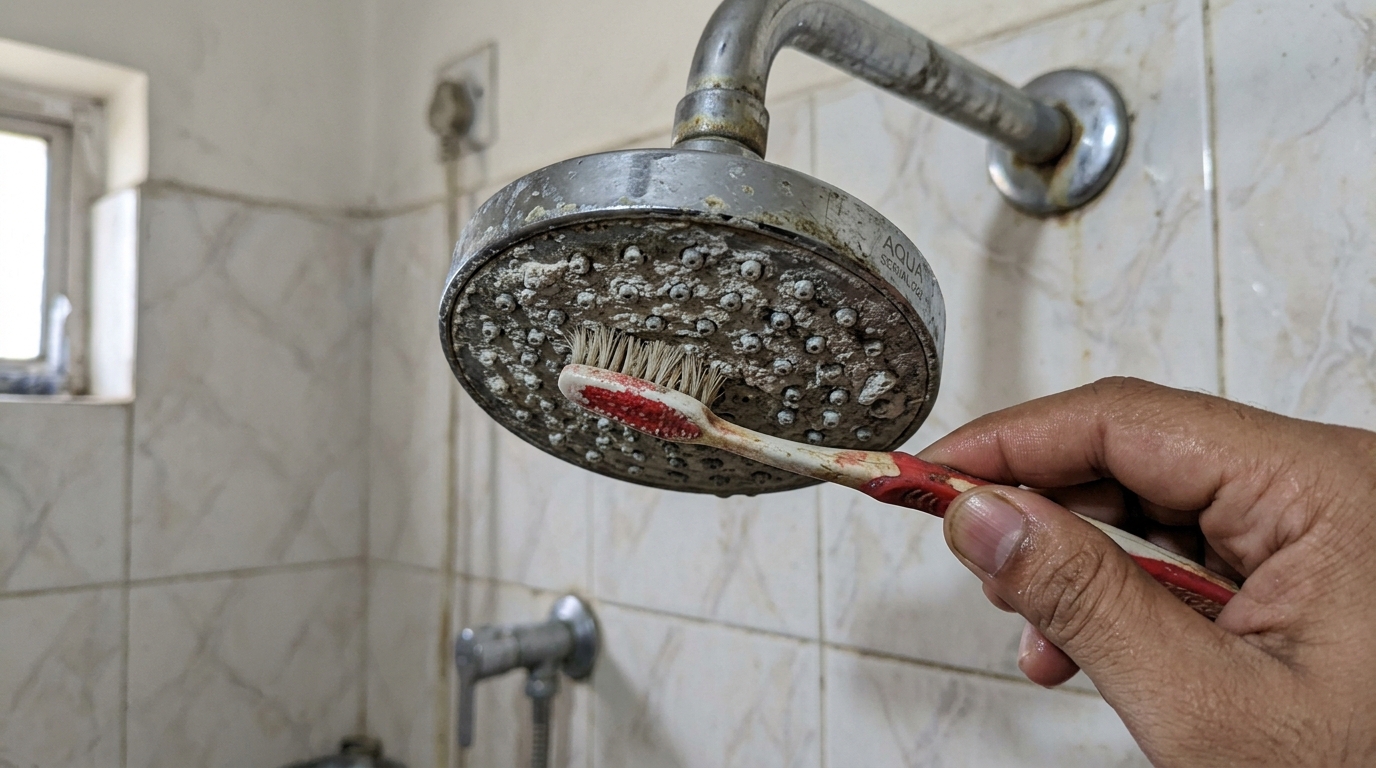
Remove the shower head from the vinegar bath. Take your old toothbrush and scrub the entire nozzle array firmly in circular motions. The softened mineral crust will disintegrate into white milky slurry. -
Step 7: Clear Stubborn Individual Nozzle Holes
Inspect the face under good light. For any persistent plugged holes, insert a thin sewing needle straight into the center of the orifice to gently shatter remaining core scale. -
Step 8: Flush Debris Under Running Tap Water
Turn on a basin tap full blast. Hold the shower head upside down and flush clean water straight through the inlet opening to sweep dislodged calcium grit out of the interior spray chamber. -
Step 9: Reattach the Shower Head to the Arm
Ensure the rubber mesh filter washer is positioned inside the swivel nut. Thread the shower head clockwise onto the wall arm or hose by hand until snug. Hand-tight is usually sufficient to achieve a watertight seal. -
Step 10: Test and Calibrate the Spray Pattern
Turn the mixer tap on full blast. Observe the restored torrent: every nozzle should fire a straight, needle-sharp, high-pressure jet without erratic sputtering or dead zones.
💡 Pro-Tips From the Field
- Adopt a 90-day vinegar refresh routine: In high-TDS borewell areas, don't wait for total spray starvation. A quick 30-minute vinegar bag soak every three months keeps nozzles flowing at factory pressure permanently.
- Clean the inlet mesh filter screen: Whenever you unscrew the shower head, inspect the tiny wire mesh inside the swivel collar. Pipe rust and tank sediment often collect here, strangling pressure even before water reaches the nozzles.
- Rub flexible silicone tips weekly during showers: While taking your daily warm shower, simply swipe your thumb firmly across the rubber tips. The flexing motion naturally cracks light scale crystals and expels them under water pressure.
Troubleshooting Common DIY Mistakes
- "I soaked it but pressure is still weak."
The buildup may be more severe than a single soak addressed, or there may be blockage further back in the shower arm, braided hose, or wall mixer cartridge. Check whether other bathroom taps suffer low pressure before concluding the shower head is at fault. - "Some nozzle holes seem permanently blocked even after scrubbing and using a needle."
Very old, deeply compacted mineral deposits can sometimes resist full clearing through cleaning alone. If multiple nozzles remain permanently choked after an overnight soak, purchasing an affordable replacement shower rose is the most practical choice. - "Vinegar smell lingers even after rinsing."
Rinse more thoroughly under running hot water for 60 seconds. Any residual acetic scent evaporates completely after the first normal shower.
Conclusion & Related Reads
Low shower pressure from hard water scaling is one of the easiest, most cost-free fixes in home plumbing — vinegar and a bit of patience restore most shower heads to like-new performance without buying any replacement parts at all.
Related reads on CarpenterWala:

Rajesh Sharma
Verified SpecialistMaster Carpenter & Woodwork Consultant
Over 15 years of custom woodworking, furniture restoration, and modular interior fittings experience in Bangalore.
⚖️ DIY vs. Hiring a Professional: When to Call an Expert
✓ Safe to DIY
- Minor screw tightening or loose hinge lubrication
- Basic component replacement with matching dimensions
- Routine surface touch-ups and non-structural adjustments
⚠️ Hire a Verified Pro
- Structural woodwork warping, masonry drilling, or rotted frames
- High electrical voltages, MCB trips, or water line pipe bursts
- Multi-room installations requiring specialized power equipment
💬 Comments (0)