📑 Table of Contents (7 sections) — Tap to expand
Quick Takeaway (Google Position-0 Summary)
To fix an overflowing or rattling refrigerator drip pan, locate the pan at the back base of the fridge (behind the rear access panel or beneath the compressor), remove and clean it of accumulated dust, mold, and debris, check that it's seated correctly and level on its mounting brackets, and ensure the defrost drain tube feeding into it isn't blocked, which is the most common cause of overflow.
Introduction & Problem Statement
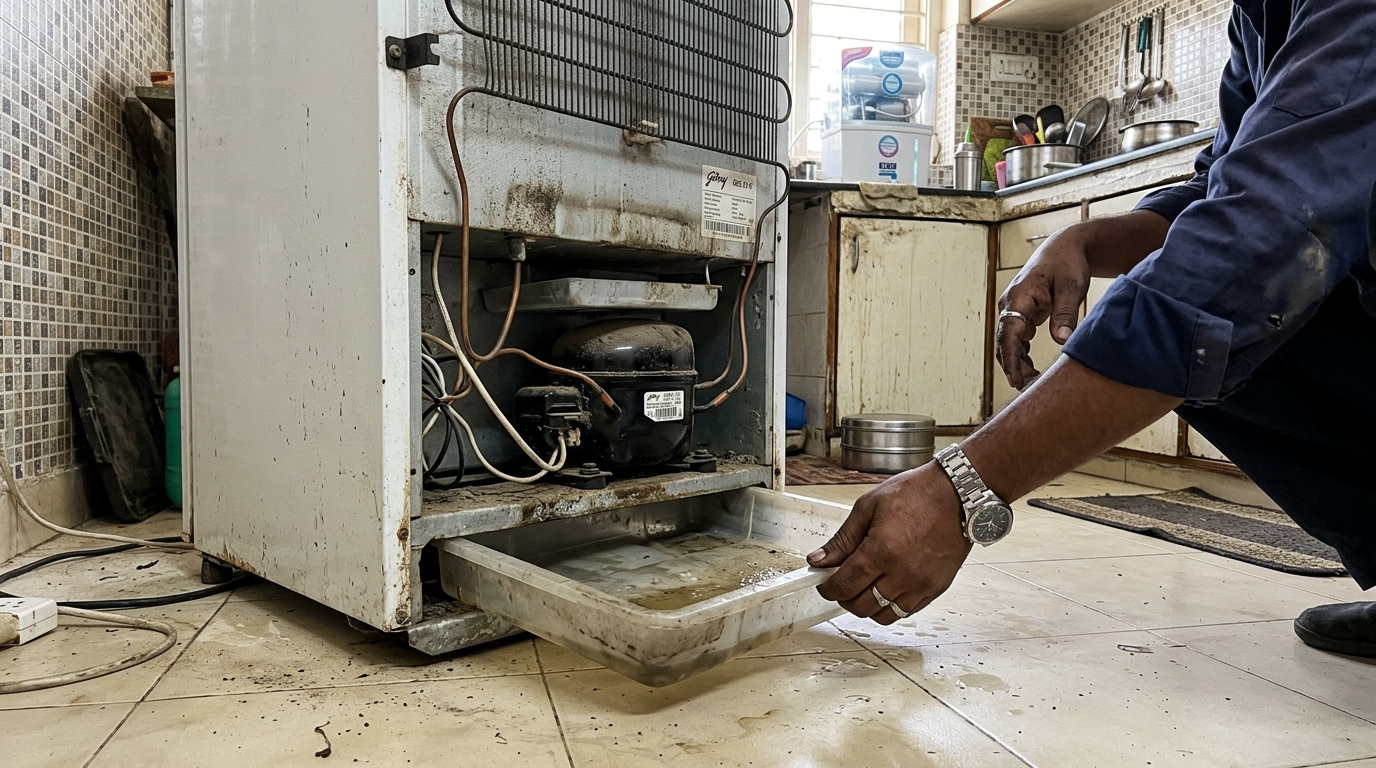
A puddle of water forming on the floor beneath or behind your refrigerator, or an annoying rattling or vibrating sound coming from somewhere low at the back of the unit, especially noticeable when the compressor cycles on. Both of these symptoms usually trace back to the same small, often-overlooked component: the defrost drip pan (sometimes called a condensate pan), a shallow tray sitting at the base of the fridge, typically near or directly beneath the compressor, designed to collect water that drains down from the automatic defrost cycle inside your refrigerator and freezer compartments.
During normal operation, your fridge periodically runs a defrost cycle to melt any ice buildup on the evaporator coils, and this water is meant to drain down through a small tube into the drip pan below, where it naturally evaporates thanks to the warmth given off by the compressor. Problems arise in a few ways: dust, pet hair, and general household grime accumulate in the pan over months and years (since it's rarely, if ever, cleaned), eventually building up enough to actually block proper evaporation or cause overflow; the pan itself can shift slightly out of its correct seated position from the compressor's vibration over time, causing it to rattle or no longer sit directly beneath the drain tube's outlet; or the defrost drain tube feeding into the pan can get blocked with debris or ice, causing water to back up and leak out before it even reaches the pan properly.
What You Will Need
Essential Tools:
- A screwdriver (for removing the rear access panel, if your fridge model has one covering the pan)
- A flashlight / torch
- A flexible brush or pipe cleaner (for clearing the defrost drain tube)
- Rubber gloves
Materials & Consumables:
- Mild soap and water (for washing the pan)
- A clean microfiber cloth or sponge
- White vinegar (for clearing mold or mineral buildup)
- A turkey baster or small funnel (optional, for flushing the drain tube with warm water)
⚠️ Critical Safety Warnings
- Unplug from power socket first: Always unplug the refrigerator from the wall socket before pulling it away or reaching into the back/base area — working around the compressor, wiring, and capacitor while powered poses a serious electric shock hazard.
- Get assistance when moving the fridge: Refrigerators are heavy and top-heavy. Attempting to pull or slide one solo risks back injury and severe scratching to vitrified floor tiles.
- Inspect for floor dampness and mold: If standing water has been present for days under the fridge, thoroughly dry and inspect the flooring and adjacent baseboards for mold or moisture seepage once the appliance is moved.
- Allow compressor area to cool: The compressor runs hot during active cooling cycles. Let the unit sit unplugged for 5–10 minutes before reaching into the machinery compartment.
- Stop immediately if wiring or burning smell is detected: If you spot frayed wiring, burned relay terminals, or oil residue near the compressor lines, stop immediately and call a certified appliance technician.
Step-by-Step Practical Execution Guide
-
Step 1: Unplug the Refrigerator
Disconnect the refrigerator from its wall power socket completely before starting any inspection or tool work. -
Step 2: Pull the Refrigerator Away From the Wall
With a helper if needed, gently walk or slide the refrigerator forward by 2 to 3 feet from the wall to grant clear, comfortable access to the rear lower machinery section. -
Step 3: Locate the Drip Pan
Inspect the lower rear base using your torch. The drip pan is a shallow plastic tray mounted directly over or alongside the black cylindrical compressor motor. -
Step 4: Remove the Rear Access Panel (If Applicable)
Many modern refrigerators feature a protective stamped metal or plastic grid covering the compressor cavity. Use a screwdriver to remove the retaining screws and set the panel aside safely. -
Step 5: Carefully Slide Out the Drip Pan
Most drip pans clip onto metal brackets or slide into guide rails. Gently unclip or slide the tray out, keeping it level to prevent stagnant water or muddy sludge from spilling onto your floor. -
Step 6: Clean the Pan Thoroughly
Take the pan to a washbasin. Wash it thoroughly with warm water, dish soap, and a sponge to scrub away pet hair, dust clumps, and slime. If mold or limescale is present, soak with white vinegar for 10 minutes and rinse clean. -
Step 7: Dry the Pan Completely
Wipe the plastic tray dry with a clean cloth before reinstallation so you can immediately detect any fresh drips during subsequent testing. -
Step 8: Locate and Check the Defrost Drain Tube
Look directly above where the drip pan sits to locate the end of the defrost drainage funnel or rubber tube exiting the refrigerator cabinet. Inspect the opening with your flashlight for algae slime, lint, or ice blockages. -
Step 9: Flush the Drain Tube if Blocked
If the tube is clogged or crusted with debris, feed a flexible nylon pipe cleaner into the outlet, then use a turkey baster or funnel to flush 1–2 cups of warm water mixed with a splash of vinegar through the line until it flows freely. -
Step 10: Reposition the Pan Correctly
Slide the cleaned, dry pan back into its mounting rails. Make sure it clicks firmly into its retaining clips and rests completely level, with the discharge tube outlet positioned squarely over the center of the tray. A loose pan will vibrate loudly against the compressor housing. -
Step 11: Reattach the Access Panel
Align the rear access grille or panel and tighten the retaining screws securely to prevent metallic buzzing sounds. -
Step 12: Push the Refrigerator Back and Plug It In
Carefully roll or push the refrigerator back into position, ensuring at least 2–3 inches of clearance from the wall for adequate air circulation. Plug the power cord back into the wall outlet. -
Step 13: Monitor Over the Next Few Days
Check the floor perimeter around the base of the fridge over the next 48–72 hours. Verify that water no longer pools and that the compressor runs smoothly without annoying tray vibration or rattling.
💡 Pro-Tips From the Field
- Clean the drip pan and condenser coils quarterly: Make it a habit to clean the drip pan and vacuum dust off the rear condenser coils every 3 to 4 months. Clean coils improve cooling efficiency by up to 20% and reduce compressor workload.
- Differentiate compressor mount vibration from tray rattle: If the buzzing persists after repositioning the pan, touch the edge of the tray lightly with an insulated tool handle while running. If the noise stops, add a small sliver of heat-resistant silicone or rubber padding to the tray rail. If it continues, check for loose compressor mounting grommets.
- Consult the model manual for integrated pans: On some frost-free multi-door models, the condensate tray is permanently clipped atop the compressor dome and cannot be slid out easily. In those models, sponge out the standing water in place and sanitize using a spray bottle.
Troubleshooting Common DIY Mistakes
- "I cleaned the pan but water is still pooling underneath the fridge."
The defrost drain tube itself is likely still blocked higher up inside the cabinet liner, causing water to overflow the internal drain gutter and spill under the crisper drawers onto the floor. Go back to Steps 8–9 and thoroughly flush the drain tube from inside or underneath. - "Pan is clean and repositioned but the rattling noise continues."
Check that the pan is clicked securely into its retaining notch. If the tray is secure, inspect the rear access cover screws — a loose sheet-metal screw vibrates intensely when the compressor motor kicks on. - "I can't find the drip pan at all on my fridge model."
Check your model's exact manual. Some compact single-door direct-cool refrigerators do not have an automatic defrost evaporator pan at the bottom; instead, they have a manual defrost catch tray directly underneath the internal freezer box inside the cabinet.
Conclusion & Related Reads
A refrigerator drip pan is one of those components that quietly does its job for years until simple neglect causes it to overflow or rattle — a periodic clean and repositioning check genuinely prevents both of these common issues from developing in the first place.
Related reads on CarpenterWala:

Rajesh Sharma
Verified SpecialistMaster Carpenter & Woodwork Consultant
Over 15 years of custom woodworking, furniture restoration, and modular interior fittings experience in Bangalore.
⚖️ DIY vs. Hiring a Professional: When to Call an Expert
✓ Safe to DIY
- Minor screw tightening or loose hinge lubrication
- Basic component replacement with matching dimensions
- Routine surface touch-ups and non-structural adjustments
⚠️ Hire a Verified Pro
- Structural woodwork warping, masonry drilling, or rotted frames
- High electrical voltages, MCB trips, or water line pipe bursts
- Multi-room installations requiring specialized power equipment
💬 Comments (0)