📑 Table of Contents (9 sections) — Tap to expand
⚡ Quick Takeaway (Position-0 Summary)
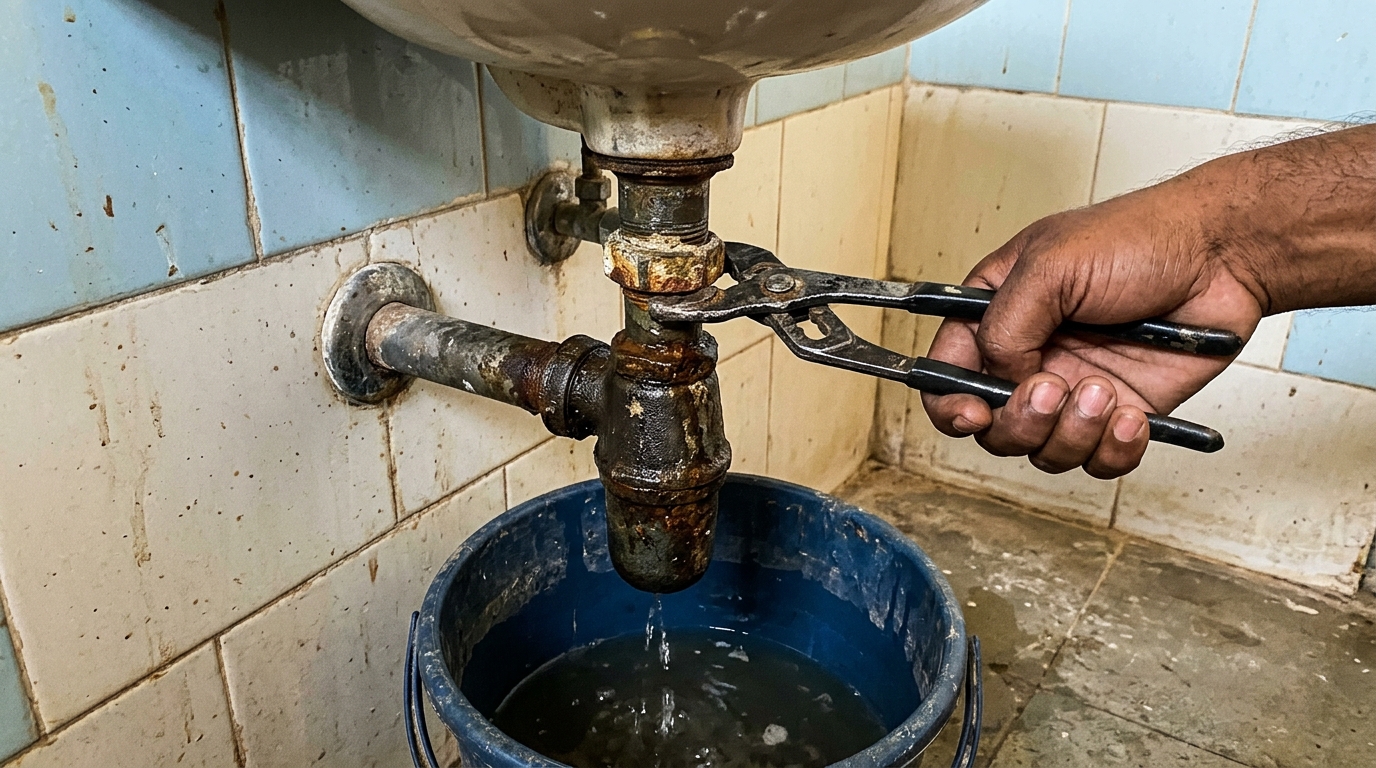
To replace a rusted washbasin bottle trap, place a bucket underneath, loosen the connecting nuts on both sides of the trap, remove the old corroded unit, fit a new matching bottle trap, hand-tighten the nuts then snug with pliers, and run water through to confirm a leak-free seal.
The Vulnerability of Metal Bottle Traps in Indian Bathrooms
That curved or cylindrical fitting under your washbasin — the bottle trap — showing visible rust, flaking metal, or active leaking at its joints, to the point where cleaning or minor washer replacement just isn't enough anymore. Bottle traps serve a genuinely important function: they hold a small reservoir of water specifically to block sewer gas from rising up through your drain and into the bathroom, while still allowing wastewater to flow through and down into the main drainage line.
Older-style bottle traps made from chrome-plated brass or basic metal are particularly vulnerable to rust once their protective plating wears through from years of water exposure, cleaning chemical contact, and simple age. Once rust penetrates the metal, it doesn't just look bad — it genuinely weakens the trap's structure, eventually leading to pinhole leaks or a trap that can crack under normal handling during cleaning. Many modern replacement options use PVC or other plastic materials specifically because they don't face this same rust vulnerability, making a rust-related trap replacement a good opportunity to upgrade material along with simply fixing the immediate problem.
What You Will Need
Prepare these plumbing tools and replacement supplies before disassembling the drain:
Essential Tools:
- Adjustable wrench or groove-joint pliers: For loosening seized metal collar nuts.
- Catch bucket: Sized to slide easily underneath the washbasin drain pipe.
- Old shop towels / rags: To clean pipe mating surfaces and mop up splashes.
- Torch / flashlight: To illuminate dark under-counter plumbing alcoves.
Materials & Consumables:
- New bottle trap assembly: High-grade PVC (rust-proof) or heavy chrome brass matching your 32mm (1.25-inch) waste pipe diameter.
- Teflon tape: For lubricating and sealing male pipe threads if required.
- Replacement rubber slip washers: Matching conical washers (usually included in the kit).
⚠️ Critical Safety Warnings
Read this before you start:
- Wear gloves throughout the entire repair: The interior of an old bottle trap harbors stagnant wastewater, decayed hair strands, and black sulfur slime. Rubber gloves protect your skin against bacterial infection.
- Beware of razor-sharp corroded metal flakes: Old chrome-plated metal traps corrode from the inside out, leaving paper-thin, razor-sharp edges around threaded collars that can slice fingers during unthreading.
- Inspect vanity woodwork for structural rot: Before beginning, check if historical seepage has rotted under-sink vanity plywood or swollen base laminates. Address any moisture rot separately once the plumbing is dry.
- Keep nearby 230V vanity sockets dry: Bathroom mirrors and vanities frequently have electrical sockets for shavers and hair dryers. Ensure water splashes never contact live outlets.
Step-by-Step Practical Execution Guide
Follow these 10 practical steps to safely unseat your corroded bottle trap and install a durable new assembly:
-
Step 1: Position a Catch Bucket Beneath the Trap
Place your plastic bucket directly under the bottle trap cylinder. Bottle traps maintain 150ml to 300ml of standing foul water by design, which will pour out the moment the lower union breaks. -
Step 2: Loosen the Upper Connecting Nut
Grip the top slip nut connecting the bottle trap to the vertical basin waste tailpiece. Turn counterclockwise. If rusted solid, spray penetrating lubricant or wrap a rag around the nut before applying pliers. -
Step 3: Loosen the Lower Horizontal Outlet Nut
Unthread the second slip nut connecting the horizontal discharge arm to the wall drain sleeve. Support the trap body with your free hand so it doesn't twist violently against the ceramic basin above. -
Step 4: Remove the Old Corroded Trap Body
Carefully tilt and lower the old rusted metal trap into your bucket, allowing black sludge and stagnant water to drain out completely. Discard the corroded unit. -
Step 5: Clean the Connection Points and Pipe Flanges
Take a damp rag and clean both the vertical brass tailpiece threads and the wall drain outlet socket. Scrape away limescale rings and shreds of hardened rubber washers. -
Step 6: Check Your New Trap Matches in Diameter and Pitch
Compare the new PVC or brass bottle trap with the old unit. Verify that the pipe diameter (typically 32mm / 1.25 inches) and horizontal wall pipe reach align cleanly with your wall drain socket without straining. -
Step 7: Fit the New Trap's Upper Vertical Connection
Slide the slip nut and beveled washer onto the vertical tailpiece (taper pointing down into the trap neck). Seat the top neck of the new bottle trap and hand-tighten the upper nut until snug. -
Step 8: Fit the New Trap's Lower Horizontal Outlet Connection
Slide the horizontal outlet pipe into the wall drain adapter, ensuring the rubber sleeve or slip washer is positioned squarely. Hand-tighten the horizontal collar nut to link the trap to the wall. -
Step 9: Snug Both Connections With Pliers
Once both nuts are hand-tight and the trap hangs perfectly vertical, use your pliers to add a quarter to half turn of rotational torque. Stop immediately once rubber compression resistance is felt to prevent cracking plastic threads. -
Step 10: Run Water and Check for Leaks
Turn the washbasin tap on full flow. Let water circulate through the trap for two full minutes. Run dry toilet tissue around both upper and lower slip joints: if the paper remains bone dry, your installation is 100% watertight.
💡 Pro-Tips From the Field
- Choose heavy-duty PVC or polypropylene for Indian water conditions: Hard municipal groundwater and harsh acidic bathroom tile cleaners rapidly eat through thin electroplated metal. High-grade PVC bottle traps will never rust, corrode, or pit.
- Clean out the vertical waste tailpiece while open: With the trap detached, run an old bottle brush up through the basin pop-up waste to scour away black bacterial hair film before installing the clean trap.
- Keep the old trap on hand for sizing reference: Keep your old trap in the bucket until the new one is fully pressure tested. If a sizing mismatch occurs, having the physical part at the sanitaryware dealer guarantees an exact exchange.
Troubleshooting Common DIY Mistakes
- "New trap doesn't fit, the pipe diameters don't match."
Don't force connections together with mismatched sizes. Return the trap and get one matching your specific basin waste pipe and drainage outlet diameters, measuring carefully this time before purchasing. - "I tightened the connections but there's still a slow drip at one joint."
Check that the washer at that specific connection is seated flat and not twisted, and confirm you haven't cross-threaded the nut. Disconnect, reseat the washer properly, and reconnect with careful alignment before retightening. - "New trap installed correctly but there's still a bad smell from the drain."
If this is a basin that isn't used frequently, the issue may simply be the trap's water seal evaporating between uses, letting sewer gas through. This is unrelated to the trap replacement itself and is resolved by periodically running water through the basin to keep the trap's water seal topped up.
Conclusion & Related Reads
Replacing a rusted bottle trap is a contained, manageable plumbing job — and switching to a PVC replacement genuinely removes rust as a future concern for this particular fitting, making it a worthwhile small upgrade while you're already doing the repair.
Related reads on CarpenterWala:

Rajesh Sharma
Verified SpecialistMaster Carpenter & Woodwork Consultant
Over 15 years of custom woodworking, furniture restoration, and modular interior fittings experience in Bangalore.
⚖️ DIY vs. Hiring a Professional: When to Call an Expert
✓ Safe to DIY
- Minor screw tightening or loose hinge lubrication
- Basic component replacement with matching dimensions
- Routine surface touch-ups and non-structural adjustments
⚠️ Hire a Verified Pro
- Structural woodwork warping, masonry drilling, or rotted frames
- High electrical voltages, MCB trips, or water line pipe bursts
- Multi-room installations requiring specialized power equipment
💬 Comments (0)